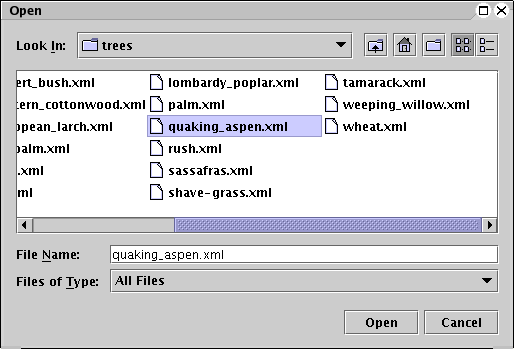
---- DATABASE ERROR ----

Quick And Dirty: Creating A Tree with Arbaro

by Mike Kost

Introduction

Ahhh, trees. Magestic sources of wood, occasionally with leaves on them. These towering trunks of tallness are apparently inspiring for ray tracers as well as the outdoorsmen since our last article on creating trees has been wildly popular (at least by our standards of popular). So, to further the development of Povray forests and greenery, this Quick and Dirty tutorial is cutting into some different tree software and showing how to generate trees using Arbaro 1.9.4 and Povray 3.6.

Arbaro

Arbaro is a freely available tree generator for Povray written in Java. This is a bit of a misnomer since Arbaro can also generate grassy plants like wheat and barley. It exports to Povray include files, .DXF, and .OBJ files. Trees are saved in a (human readable) .xml file and Arbaro includes both a command line generator and a GUI. Out of the box, Arbaro includes files to generate 20 different tree types. Arbaro trees are good background and filler trees, but lack the extreme detail that would make them good for close-up renderings.

To get Arbaro, visit the Arbaro Sourceforge project page. Arbaro runs on Java, so you need a reasonably up-to-date version (1.4.2 or greater). If you're missing it, Sun Microsystems will be more than happy to provide the latest Java version. For the Linux purists, GNU Java does not appear to run Arbaro yet.

As always, all the rendered images are linked to the scene files.

Running Arbaro

After downloading Arbaro, unzip it anywhere that's convenient. If you're running Windows, double click on arbaro_gui.jar in the Arbaro folder. If you're running Linux, invoke it on the command line from the unzipped Arbaro directory.
java -jar arbaro_gui.jar
After this, you should be greeted with the Arbaro opening window
Arbaro Main Window
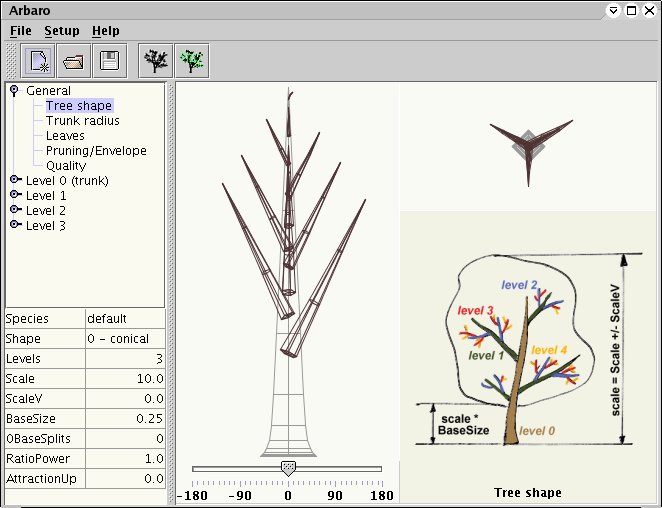
Take a few minutes to wander around and get a feel for the GUI.

Exporting A Tree

Now to get into the good stuff. To load one of the trees included with Arbaro, select File->Open from the menu. Select the Quaking Aspen file from the trees subdirectory and click Open.
Arbaro Open Window
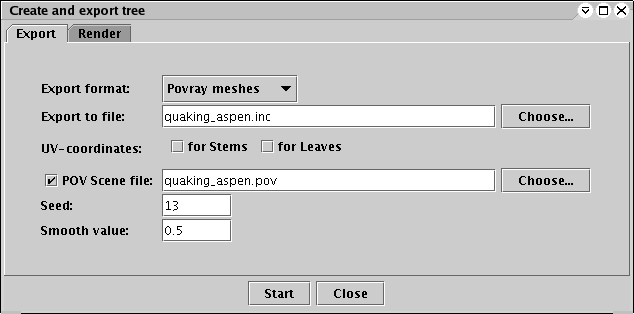
The newly opened tree is now up in the GUI. Wander around some more if you like, and then select File->Export from the menu. Arbaro, by default, exports to a Povray include file. It will also generate a scene file that can be used to do a test rendering if the checkbox is selected. Click the checkbox to generate the POV Scene file and click on start.
Arbaro Export Window
If there are problems exporting or Arbaro appears to hang while exporting, you've probably run out of memory. Java picks a default amount of memory to make available to Arbaro when you start it, and sometimes it needs to be increased to export some of the larger trees. If you have problems, start Arbaro as follows:
java -Xms100m -Xmx200m -jar arbaro_gui.jar

Now that we've got a tree to work with, lets render!

Rendering The Tree

Since Arbaro generated a scene file, start by rendering this. The generated quaking_aspen.pov and quaking_aspen.inc contain everything necessary.
Quaking Aspen rendering
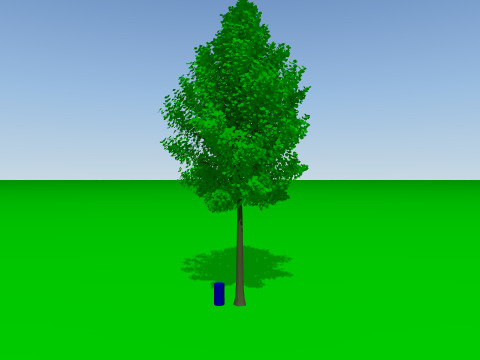
That initial scene shows that there's a tree in the include file, but it's not very much to look at. To get a bit more out of the tree, it's time to construct a scene file. To do this, we need a bit more information. The include file specifies the tree branches and leaves separately so each will need to be instanced. Search through the include file and you'll find 3 declares that contain tree information.
#declare Description
quaking_aspen_13_stems
This object contains all of the tree branches
quaking_aspen_13_leaves
This object contains all of the tree leaves
quaking_aspen_13_height
This is a constant that specifies the tree height
When new and different trees are created, the names will change so search them out after exporting the tree.

The base of the tree is centered around the origin (<0,0,0>) and the tree proceeds in the +Y direction for quaking_aspen_13_height*Y units. The other big thing to note is that Arbaro does not add any color to the trees. That means the scene file has to do it. The following code snippet has everything necessary to place the tree in a scene
#include "quaking_aspen.inc"

union {
    object {
       quaking_aspen_13_stems
       pigment { color rgb <144/255, 104/255, 78/255> } // brown
    }
    object {
       quaking_aspen_13_leaves
       pigment { color rgb <0, 1, 0> } // green
    }
}
Add some ground, a sky, and adjust the lighting a little, and you'll have a tree to be proud of. In this case, a unit tall cylinder was included for reference.
Pretty Tree

Want To Know More?

As with other free tree generators, there isn't much out there, but there is a little

Published: 11/13/2005
Last Edited: 11/19/2005

Copyright (C) 2005 Mike Kost